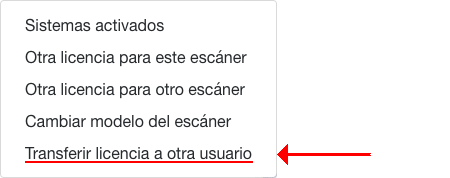
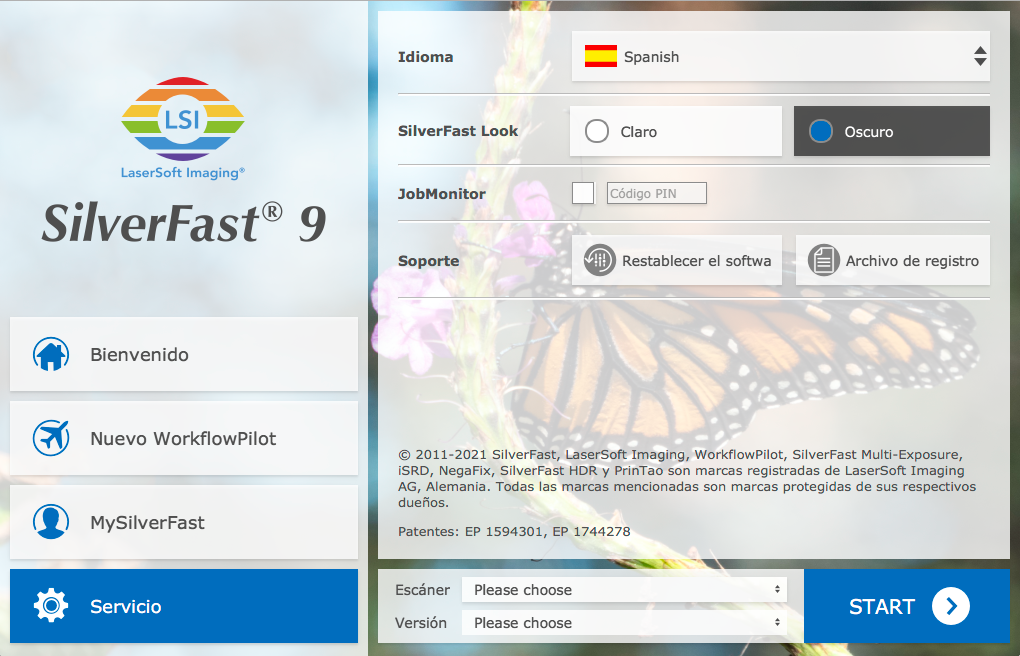
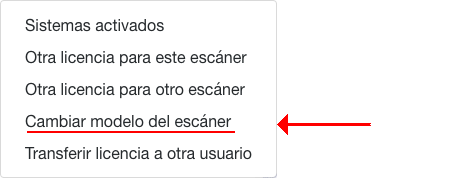
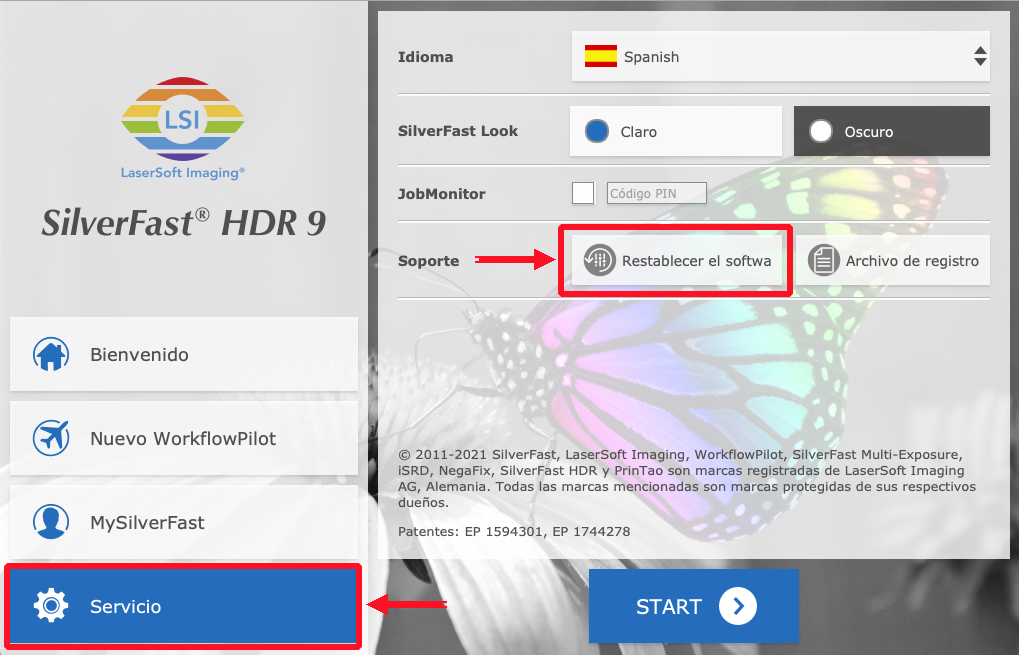
| ¿Cómo reiniciar SilverFast a los ajustes de fábrica? |
Usted puede reiniciar SilverFast a través del servicio de diálogo en la pantalla de bienvenida de SilverFast.
|
|
|
| | |
|
 | ¿Qué cara de la película debe apuntar hacia arriba? |
Los fabricantes dan normalmente para esto indicaciones que ayudan a que los escaneos estén orientados correctamente.
Por lo general, le recomendamos colocar la cara de la emulsión mirando hacia abajo y después rotar / reflejar la imagen en SilverFast, de ser necesario. El motivo para esto es evitar que caiga polvo sobre la cara de la emulsión, algo que es muy difícil de limpiar.
Usted puede identificar la cara de la emulsión fácilmente. Esta es generalmente más opaca y muestra una estructura ligera. El lado sin emulsión suele ser más brillante y plano.
|
|
| Después de haber instalado la actualización actual de Photoshop, faltan los plug-ins de Photoshop. |
Photoshop no traslada de manera automática a la nueva versión los plug-ins instalados con una actualización a la siguiente generación.
Próximos archivos de instalación para productos de LaserSoft Imaging tendrán en cuenta esto e instalarán los plug-ins también en Photoshop CC 2019.
También es posible instalar los plug-ins manualmente. Para esto, puede simplemente copiar o mover las entradas de una instalación anterior de Photoshop al directorio de plug-ins de la versión actual.
La carpeta de plug-ins se encuentra directamente en la carpeta de instalación de la respectiva versión de Photoshop, por ejemplo:
Para Windows:
C:/Programme/Photoshop CC2019/Plug-ins
Para macOS:
/Applications/Photoshop CC2019/Plug-ins |
| | |
|
| Mis escaneos presentan líneas |
Hay diversos motivos por los que podría haber líneas en su imagen.
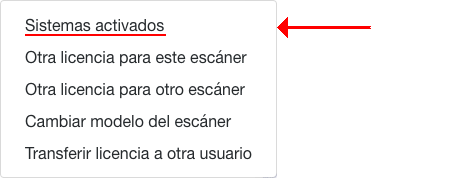
1. Líneas gruesas rojas o azules con la misma distancia entre sí
Probablemente su versión de SilverFast utiliza una versión desactualizada.
-Abra el diálogo de servicio de la pantalla de bienvenida
-Haga clic en el botón resetear SN y salir del programa
-Vuelva a iniciar SilverFast e introduzca su nuevo número de serie
2. Líneas grises borrosas
Esto se trata muy probablemente del resultado de polvo en la lámpara o el sensor.
Puede encontrar información sobre cómo limpiar el dispositivo en el manual de su escáner o con su fabricante.
3. Líneas finas coloreadas
Esto puede ser el resultado de fallas eléctricas, especialmente por lámparas fluorescentes, congeladores, acondicionadores de aire, ventiladores o dispositivos similares. Las regletas con protección contra sobretensiones pueden ayudar a evitar esto. Sin embargo, en algunos casos estas líneas pueden ser el resultado de un dispositivo averiado. |
|
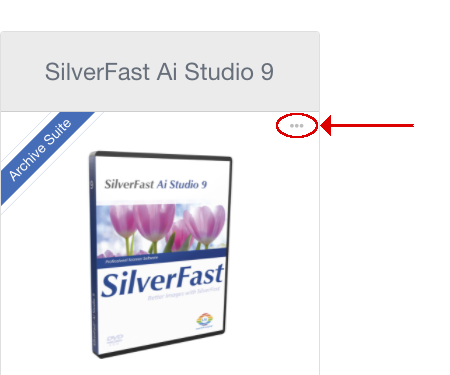
| Tengo un Archive Suite. ¿Cómo inicio sus componentes? |
|
Archive Suite contiene el software para escáneres SilverFast y la aplicación SilverFast HDR (Studio) para el procesamiento offline. Cada uno debe ser instalado de manera separada y cada uno se inicia con su propio icono.
|
|
|
| | |
|
 | Image information. |
Lists all your settings for your currently active scan-frame. |
| | |
|
 | The Prescan. |
The Prescan obtains a fast scan image from the scanner which allows you to make all your settings.
This is the first step to a scan in SilverFast SE, SEPlus and Ai Studio. |
| | |
|
 | Select Scan mode. |
Available options depend on scanner model:
 reflective reflective for paper and other opaque materials. Only available on flatbed devices.
transparency for scanning slides and film.
wide transparency for scanning large slides and film. (Available only on certain EPSON scanners.) |
| | |
|
 | The VLT. |
The Virtual Light Table is used to open images for processing in SilverFast HDR (Studio)
It allows you to preview your images prior to opening them.
Simply select the images you want to process and drag them onto the JobManager.
To do so mark the images.
Then click on one of them and wait for the mouse to turn into a hand symbol.
Now drag the images onto the JobManager icon.
Holding the Shift-key allows you to use the standard file explorer.
|
|
|
| | |
|
 | Select the image auto adjustment you want to use. |
SilverFast offers various automatic image adjustment methods.
Using them will automatically set the highlights, shadows and gradation to suit your individual image content.
This is an important step and necessary for all images.
|
|
|
| | |
|
 | Select Medium. |
Positive for scanning slides and reflective media.
 Kodachrome Kodachrome for scanning Kodachrome slides. (only available in transparency mode.)
 Negative Negative for converting negatives into positives using NegaFix. (only available in transparency mode.) |
| | |
|
 | Zoom tool. |
Clicking this button zooms into the active scan-frame or back to the full view.
Holding the command(Mac)/Ctrl(PC) key and left mouse button allows you to drag a box around an area to zoom into. |
| | |
|
 | Histogram adjustments. |
The histogram allows you to manually adjust the highlights, shadows and midtones.
If necessary it also allows you to set the color space compression and adjust the color cast removal strength (CCR).
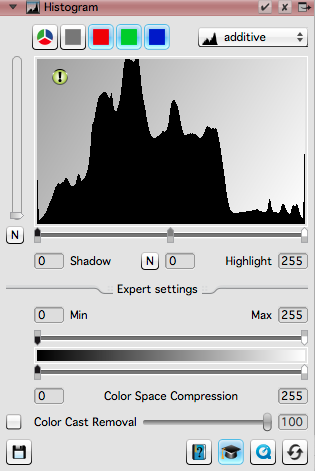
|
Depending on your version of SilverFast you can select various ways to display the histogram.
The main area of the histogram shows the distribution of the color values throughout the image.
Below it you can drag the markers for the shadows, mid-tones and highlights.
In the expert settings you can select the colorspace compression
and set the color cast removal(CCR) value

more movies
|
|
| | |
|
 | Rotation and flip tool. |
Used for rotating and flipping the entire workplace.
The tool for the rotation of individual frames on a flatbed is located in the densitometer expert settings. |
| | |
|
 | Creating and changing scan frames. |
The Frame menu allows you to access all tools used for creating, saving, loading, copying and deleting frames.
It allows you to automatically create frames using the automatic find frames option.
On devices which can handle several frames (like flatbed devices) it allows you to easily copy settings to all frames from the selected frame to all others.
In SilverFast Ai Studio it further allows you to save and load settings for a frame and even use them as default for all frames you create.
This for example includes the resolution and the settings for all active tools. |
| | |
|
 | Gradation adjustment. |
The gradation allows you to individually adjust the brightness values.
The Midtone slider allows you to make your image appear brighter without "burning out" any colors. Which is why the slider has certain limits.
In addition you can adjust the contrast values.
|
|
|
| | |
|
| ¿Cómo puedo obtener rápidamente una imagen natural? |
|
SilverFast ofrece varios métodos automáticos de ajustes de imagen. Usándolos, se ajustará automáticamente las luces, sombras y gradación para ajustar el contenido individual de su imagen.
|
|
|
| | |
|
 | Pipette tool. |
The pipette tool allows you to manually select the highlights and shadows in your image and remove color casts.
To remove a color cast simply open the pipette tool and select the neutral point pipette.
Now click on the an area in your image which should be a neutral grey.
SilverFast will use this information to remove the color cast.
SilverFast Ai Studio allows to set up to 4 neutral points for an even more precise correction.
Using the 4 point pipette in Ai Studio:
|
|
Using the single point pipette:
|
more movies
|
|
| | |
|
 | Un-Sharpening Mask (USM) |
The USM tool allows you to sharpen your images.
To view your changes in the preview window please activate the 1:1 preview in the USM dialog.
|
|
|
| | |
|
 | ¿Qué profundidad bit debo usar? |

48->24 Bit es la opción estándar usada para imágenes .jpg y para la mayor parte de las imágenes estándar. |
| | |
|
 | How do I adjust the global color values using the Global CC? |
The Global Color Correction can be helpful for:
-remove color casts.
-adjust color perception.
-adjust global color temperature.
|
|
|
| | |
|
 | iSRD infrared scratch and dust removal. |
iSRD is a fully automatic scratch and dust removal tool. It detects defects through the hardware using the scanners infrared sensor.
This option is only available for transparency scans and scanners which offer an infrared channel.
It can not be used with silver halide based B&W film. The silver halide emulsion of these films block the infrared beam (more info here).
|
|
|
| | |
|
| ¿Cómo puedo medir la máxima resolución para mi escáner? |
El borde de contraste define la resolución real que puede obtener un dispositivo individual.
Este valor varía de la resolución física dada debido a varios efectos físicos.
Este conocimiento le permite seleccionar la resolución más eficaz para sus escaneos.
Obteniendo la mejor resolución y nitidez mientras se limita el tiempo de escaneo.
LaserSoft Imaging ofrece el target de resolución USAF para medir esta resolución.
Esto le permite medir la mejor resolución de su escáner y ajustar los valores óptimos USM para una cierta resolución.
Puede encontrar más información sobre USAF aquí en nuestra web.
Estos targets también pueden ser comprados en nuestra tienda en línea.
Para más información por favor visite nuestra página de videos.
Aquí encontrará nuestros vídeos sobre los ajustes de resolución para su producto SilverFast. |
| | |
|
 | How to adjust individual colours. |
The Selective Color Correction (Selective CC) allows you to select individual color values and adjust them.
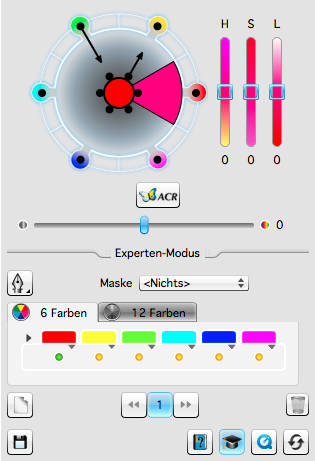
For greyscale mode this tool is replaced by the Selective Color to Grey (SC2G) tool.
|
Simply click on the center circle and the pick a color from your image.
Now you can edit the colour value by dragging the small black circles or by changing the HSL(Hue, Saturation, Luminescence) values.
The Expert mode allows you to limit the changes by adding a mask.
You change between 6 colour and 12 colour editing mode.
And use presets for the individual color channels.
In SilverFast Ai Studio you can use up to four individual layers for masks with individual settings.
|
| |
| | |
|
 | Auto Adaptive Contrast Optimization. (AACO) |
AACO enhances specific contrast levels.
By individually adjusting it's settings to a specific image you can enhance the visibility of certain areas.
|
|
|
| | |
|
 | SRD scratch and dust removal. |
SRD is the software sided scratch and dust removal. Other than the hardware based iSRD this tool must be adjusted individually to each image. To view our changes you have to activate the 1:1 preview in the SRD tool dialog.
The SRD tool always must be individually tailored to each image. The expert dialog offers the possibility to use masks to limit the correction to certain areas. SilverFast Ai Studio offers up to four layers with different settings.
SRD has been replaced by the more advanced SRDx in version 8.8
|
|
|
| | |
|
 | Scan / Process |
This is the final step.
After pre-scanning/loading and setting up your image it starts the final scan (SilverFast SE, SE Plus and Ai Studio) or processing ( SilverFast HDR and HDR Studio) of the image.
It also allows you to switch between batch and single mode.
|
|
|
| | |
|
 | Grain and Noise Elimination. (GANE) |
GANE allows you to remove the film grain and sensor noise from a scan.
Many current scanners are able to scan at resolutions which are higher than the film resolution.
In such cases the film structure (grain) becomes visible.
The noise is a natural effect occurring in the scanner sensor.
SilverFast's Multi-Exposure (available in SilverFast SE Plus and Ai Studio)can prevent this from occurring.
|
|
|
| | |
|
 | Descreening. |
Removes print screen from reflective material.
This tool is only available for flatbed devices in reflective mode.
In case this tool does not work as expected, please check the entered screen value.
|
|
|
| | |
|
 | Multi-Exposure. (ME) |
Multi-Exposure uses two separate scans to achieve a much higher Dynamic-Range than a standard scan could.
This greatly reduces sensor noise. Especially in dark image areas. Additionally the higher Dynamic-Range offers a great advantage when processing images in professional imaging software like SilverFast HDR Studio or Photoshop.
Multi-Exposure is available in SilverFast SE Plus and Ai Studio.
|
|
|
| | |
|
 | Herramienta de enfoque |
La herramienta de enfoque está ahora disponible si el escáner ofrece la función de enfoque.
Las opciones que estén también disponibles depende de las funciones que ofrezca su escáner.
Escáneres con una unidad de enfoque fijo no ofrecen esta herramienta.
Control manual del enfoque
Por favor, vea nuestro video y el manual PDF para aprender cómo utilizar el control manual del enfoque.
|
|
|
| | |
|
 | IT8 calibration. |
The IT8 calibration creates an individual ICC profile for your scanner. It makes sure your scanner produces correct colours and utilises the entire range of colours available from it's sensor.
This is a basic step in professional image processing.
The SilverFast IT8 calibration is fully automatic. In most cases no user interaction is required. Only the target's reference file might have to be provided. The profile is automatically created and put in use.
The IT8 calibration is available in SilverFast Ai Studio.
|
|
|
| | |
|
 | Can I adjust my calibrated printer profile? |
Yes you can. The Printer Calibration Profile Editor allows you to adjust your calibrated profiles to your workflow.
Since color is a subjective perception, SilverFast offers the option of editing the generated profile according to the user’s desires.
|
|
|
| | |
|
 | Scans from Black&White negatives show artifacts. |
| | |
|
 | How do I copy selected settings using the JobManager? |
You can copy selected settings using the copy&paste function in the JobManager.
It allows you to copy individual settings and options from one image to one or more others.
It allows you to either copy manual settings or the auto adjustment you would like to use.
The automatic image adjustment (e.g. auto CCR) will then be individually executed for each image.
|
|
|
| | |
|
 | JobManager. |
The JobManager allows you to set up jobs containing several images.
You can define the order in which the images are scanned (for auto numbering).
You can copy selected settings and combine them individual settings for individual images.
It allows you to either copy manual settings or the auto adjustment you would like to use.
The automatic image adjustment (e.g. auto CCR) will then be individually executed for each image.
The JobManager is available in SilverFast Ai Studio and HDR (Studio).
|
|
|
| | |
|
 | PrinTao. |
SilverFast Ai/HDR Studio offers the integrated PrinTao printing interface for directly printing your scans.
It is includes in SilverFast Ai Studio and HDR Studio.
Please do not confuse this option with our new and advanced PrinTao 8 Software.
|
|
|
| | |
|
| ¿Cómo configuro un escáner por lotes con mi escáner plano? |
Para poder escanear por lotes sus imágenes usted tiene que crear primero márgenes de escaneo individuales para cada imagen. La manera más sencilla de hacer esto es usando la opción “buscar márgenes” en el menú de márgenes.
Cada margen tiene sus propios ajustes. Usted puede ajustar un margen y luego utilizar la opción “copiar ajustes a todos los márgenes”, también la puede encontrar en el menú de márgenes.
Para comenzar el escaneo por lotes simplemente haga clic y mantenga pulsado el botón de escaneo para seleccionar el modo de escaneo por lotes en el menú que le aparecerá.
|
|
|
| | |
|
 | Overview |
This tool is only available for Scanners with automated filmstrip or slide magazine processing.
It allows you to get an overview of the filmstrip and select (blue) which images to scan.
An offset correction tool is also available to correct the position of individual images.
This is only available if the software supports offset correction.
Users of slide magazine scanners can set up the magazine position and amount of slides.
Scanners with dual scan mode (single slide and film strip) only show this option if a film strip is inserted.
|
|
|
| | |
|
 | Which workflow should I use? |
The WorkflowPilot offers various goal-orientated, pre-set guided workflows.
It is meant as a trainig/tutorial tool to learn necessary steps in creating an image.
SilverFast Ai Studio additionally allows you to create your own workflows in the SilverFast preferences.
Follow this link for a list of available workflows.
|
| | |
|
| ¿Cómo puedo iniciar SilverFast con ajustes de márgenes personalizados? |
Esto también permite la creación de nuevos márgenes usando ajustes personalizados |
| | |
|
 | Photoshop does not show the image's meta data correctly. |
The meta data in SilverFast is written using the IPTC NAA-/IIM-Standard.
According to this standard the tags are written correctly.
Photoshop however uses its own format for metadata called IPTC XMP.
Unfortunately this causes Photoshop to show some tags incorrectly. |
| | |
|
| Un offset ocurre en la herramienta de enfoque manual. |
| | |
|
 | My question is not covered by the entries above. |
| | |
 English
 Deutsch
 Français
 Italiano
 日本語
日本語 Español
 Português
 Russian
 Chinese (Simp.)
 Checo
Checo Polaco (solo tienda)
 SilverFast 9
 Preguntas antes de la venta
 Preguntas tras la compra
 Apple OSX
 Preguntas específicas de Windows
 Problemas específicos del escáner
 Preguntas en relación con el registro
 Problemas con la serialización
 How to Update/Upgrade
 Preguntas sobre el uso
 NegaFix
 Preguntas generales