 English
 Deutsch
 Français
 Italiano
 日本語
日本語 Español
 Português
 Russian
 Chinese (Simp.)
 Tschechisch
 Polnisch (nur Shop)
Over the years I have reviewed many scanners for both photo-i and photographic magazines. I have seen a sharp rise in quality that flatbed scanners now offer, especially for film scanning. The biggest test for a flatbed scanner is scanning 35mm, this requires precise alignment of CCD sensors and sufficient depth of focus to allow for any slight buckling or slide mount thickness.
18 months ago I attended a Canon launch, where I was told that the latest scanner, the 9950F was going to replace their dedicated film scanner. Now this was something that had to be investigated. I eagerly awaiting the arrival of this scanner, could this be the answer to all our wishes, a 4800 dpi flatbed scanner that could match a dedicated film scanner?
Some of you may recall that I had problems with the initial scanner, so much so that I had to abandon the interactive review. Canon were quick of the mark and supplied a replacement unit, which performed OK. I continued on with the review. The 9950F is an excellent scanner in every respect, the construction is first class, the film holders cater for most photographic needs, but as with the 9900F the thing that lets this otherwise excellent scanner down is the ScanGear software - this is the same software that is supplied with Canon's entry level scanners. It's OK up to a point, but for high end quality scanning it leaves a lot to be desired.
In April 2005 LaserSoft Imaging announced that a version of SilverFast Ai was available for the 9950F, I have obtained a copy of this and I will re-test the Canon 9950F using this software. If you missed the review then click here interactive review of the 9950F. In this SilverFast review I will not cover the scanners functions other than those that are directly affected by the software.
The interface
Installing SilverFast is an automated process, just put the CD in and off it goes. Enter the long code in and your in business. I should point out at this early stage, that you have to buy a version for your own specific scanner, you can't use the Canon 9950F version on an Epson 4990 or other scanner. LaserSoft supports a number of film and Flatbed scanners, check out the LaserSoft site.
A SilverFast icon is placed on your desktop, double click this to launch the SilverFast Launcher, this in turn launches the SilverFast scanning software. Using the desktop launcher method you can scan directly to a folder on your computer, you can also set the Options to open the file in your application associated with the file type - only three file types available Tiff, JPG and EPS. The JPEG setting also has its own options for compression etc. The other method of launching is to use the normal Import or Acquire command in Photoshop or other application.
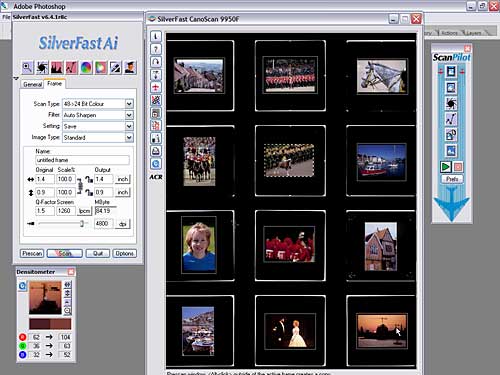
All twelve mounted slides on view
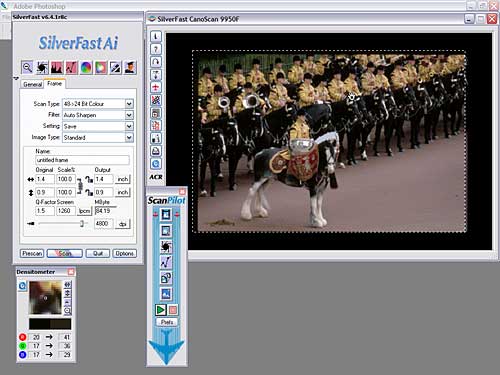
Zoom into the active image
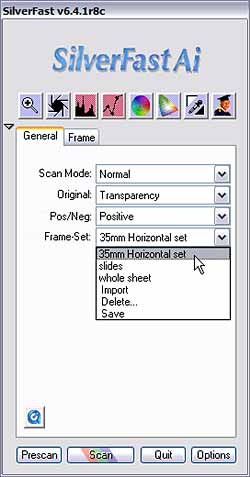
Looking at the default interface, on the left is the control panel with two tabs. The first tab is the General tab; this has the option for scan mode (Normal, Batch mode, Normal File and Batch Mode File), Below this are the settings for material to be scanned, Pos/Neg and save Frame set (all the selections you make on the images). Here's a tip from me - if you intend doing lots of batch scanning then place all your slides in the same orientation that way you can just load up a frame set and it should more or less fit your next batch of slides. At the bottom left hand corner of the General tab is a Quick Time movie tutorial link, these are quite dotted throughout the interface and will save you having to search through the manual and PDF files. They are generally very good but I think Karl needs to liven up his delivery pace.
 |
 |
| General tab | Frame tab |
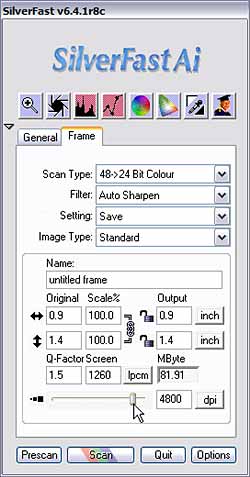
The second tab "Frames" has the scan type settings 48 to 24 bit colour - default, 16 - 8 bit greyscale, 1 bit line art, 48 bit colour, 16 bit greyscale, 48 bit HDR colour and 16 bit HDR greyscale. (HDR = High Dynamic Range scans these are the equivalent of RAW format). This means you can scan in your files and keep all the image data in tact and then at a later stage edit them and apply your adjustments. A valuable feature for those who need to archive material.
The filters include, Sharpen, Auto Sharpen, More Auto Sharpen, Less Auto Sharpen, USM, Descreening, Descreening & USM and GANE. (Grain and Noise Elimination). Your settings in the Frame tab can be saved in the next drop down list. Image type is a list of preset settings for various subject matter such as portraits, landscape, snow, night and you can add your own settings to the list - train spotting, wild flowers, pubs in Kent etc.
The next collection of settings is for your input and output sizes. If you intend using the Auto Sharpen then you should set these up with the correct settings for maximum quality. At the base are the Pre scan, Scan, Quit and Options buttons (hold down the Alt key and the Options buttons changes to a Reset button - just in case your colours are not looking the way you imagined.
All the colour adjustments are on the top row, I will deal with these over the next page or two. So far the interface is looking very nice and easy to follow, I can't see any problems.
However, the one thing that I found very annoying was, when in normal scan mode from within Photoshop the SilverFast software shuts down after each scan, you can set it to automatically open again but this involves watching the software close down and then re-launch itself - a time waster. I would have also liked an auto name and numbering system, this is available when you batch scan but not for single file scanning.
(Source: photo-i, Vincent Oliver, 2005)