| J’ai plusieurs scanners et versions de SilverFast.
Comment puis-je les choisir? |
|
Le dernier module de SilverFast doit être installé pour chaque scanner. Ensuite, vous pouvez sélectionner le périphérique en utilisant la source d'image dans le menu déroulant.
|
|
|
| | |
|
 | Quelle face du film doit être tournée vers le haut ? |
Les fabricants fournissent généralement des instructions à cet effet, qui servent à garantir que les numérisations sont correctement alignées.
Cependant, en général, nous recommandons de mettre le côté émulsion vers le bas et de tourner / retourner l'image dans SilverFast si nécessaire. La raison est d'éviter que la poussière ne se dépose du côté de l'émulsion, qui est très difficile à nettoyer.
Vous pouvez facilement identifier le côté émulsion. Celui-ci est généralement plus terne et présente une légère texture. La face non émulsionnée est généralement plus brillante et plus plate. |
|
| After the current Photoshop update has been installed, the Photoshop plug-ins are missing. |
When upgrading to a new generation, Photoshop does not automatically move the installed plug-ins to the new version.
Upcoming installation files for LaserSoft Imaging products will take this into account and install plug-ins in Photoshop CC 2019 as well.
It is also possible to manually move the plug-ins. Therefore, the entries can simply be copied or moved from an older Photoshop installation into the plug-in directory of the current version.
The plug-ins folder is located directly in the installation folder of the respective Photoshop version, for example:
For Windows:
C:/Applications/Photoshop CC 2019/Plug-ins
For macOS:
/Applications/Photoshop CC 2019/Plug-ins |
| | |
|
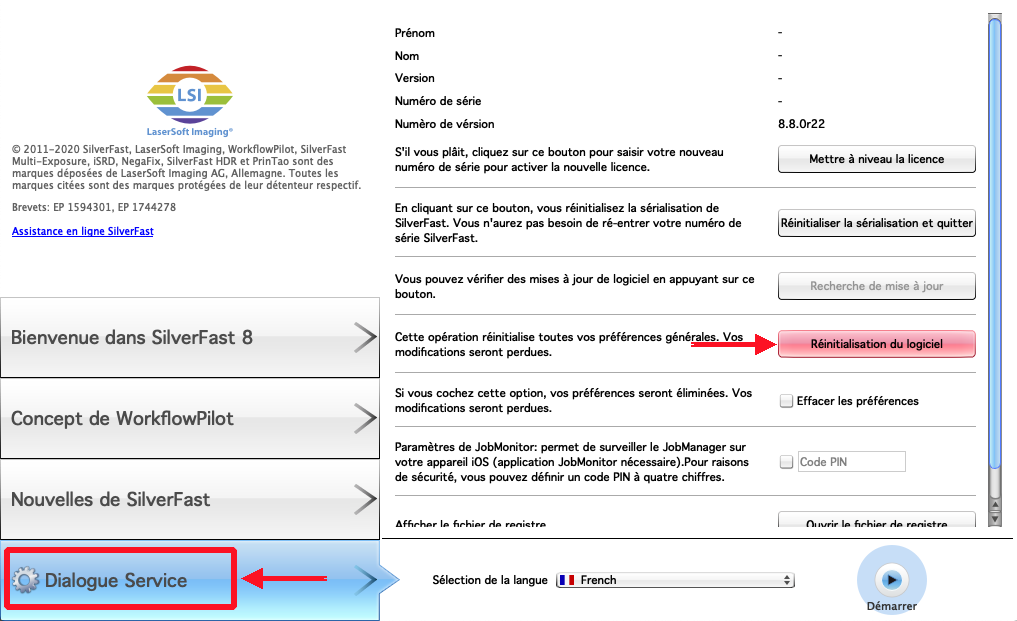
 | Mes numérisations montrent des rayures |
Il peut y avoir plusieurs raisons aux rayures dans une image.
1. Des lignes épaisses, rouges ou bleues avec écart égal.
Votre version SilverFast utilise peut-être une licence dépassée.
- Ouvrez le dialogue de service de l’écran de bienvenue
- Cliquez sur le bouton Réinitialiser numéro de série et quitter logiciel
- Redémarrez SilverFast et saisissez votre nouveau numéro de série
2. Des lignes grises floues
C'est très probablement le résultat de la poussière sur la lampe ou le capteur. Pour obtenir des informations sur le nettoyage de l’appareil, consultez le manuel de votre scanner ou contactez le fabricant.
3. Des lignes fines et colorées
Celles-ci peuvent être le résultat d'interférences électriques, notamment des lampes fluorescentes, des congélateurs, des climatiseurs, des ventilateurs ou d'autres appareils similaires.
Les blocs multiprises avec protection contre la surtension peuvent aider à éviter cela.
Toutefois,dans certains cas, ces rayures peuvent être le résultat d'un appareil endommagé. |
|
| J’ai une Archive Suite. Comment dois-je commencer ses composants? |
|
Archive Suite contient le logiciel SilverFast pour les scanners et SilverFast HDR (Studio) pour un traitement hors ligne. Chacun doit être installé séparément et chacun commence avec sa propre icône.
|
|
|
| | |
|
 | Image information. |
Lists all your settings for your currently active scan-frame. |
| | |
|
 | The Prescan. |
The Prescan obtains a fast scan image from the scanner which allows you to make all your settings.
This is the first step to a scan in SilverFast SE, SEPlus and Ai Studio. |
| | |
|
 | Sélectionner mode Scan. |
Options disponibles selon le modèle du scanner:
 Réfléchissante Réfléchissante pour le papier et autres matériaux opaques. Seulement disponible sur les scanners à plat.
Transparence pour la numérisation de diapositives et de films.
Transparence ample pour la numérisation de grands diapositives et films. (Disponible uniquement sur certains scanners EPSON.) |
| | |
|
 | The VLT. |
The Virtual Light Table is used to open images for processing in SilverFast HDR (Studio)
It allows you to preview your images prior to opening them.
Simply select the images you want to process and drag them onto the JobManager.
To do so mark the images.
Then click on one of them and wait for the mouse to turn into a hand symbol.
Now drag the images onto the JobManager icon.
Holding the Shift-key allows you to use the standard file explorer.
|
|
|
| | |
|
 | Select the image auto adjustment you want to use. |
SilverFast offers various automatic image adjustment methods.
Using them will automatically set the highlights, shadows and gradation to suit your individual image content.
This is an important step and necessary for all images.
|
|
|
| | |
|
 | Sélectionner Matériel. |
Positif pour la numérisation de diapositives et matériau réfléchissant.
 Kodachrome Kodachrome pour la numérisation de diapositives Kodachrome. (disponible uniquement en mode de transparence.)
 Négatif Négatif pour convertir le négatif en positif en utilisant NegaFix. (disponible uniquement en mode de transparence.) |
| | |
|
 | Zoom tool. |
Clicking this button zooms into the active scan-frame or back to the full view.
Holding the command(Mac)/Ctrl(PC) key and left mouse button allows you to drag a box around an area to zoom into. |
| | |
|
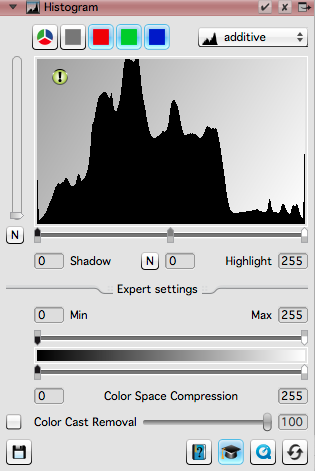
 | Histogram adjustments. |
The histogram allows you to manually adjust the highlights, shadows and midtones.
If necessary it also allows you to set the color space compression and adjust the color cast removal strength (CCR).
|
Depending on your version of SilverFast you can select various ways to display the histogram.
The main area of the histogram shows the distribution of the color values throughout the image.
Below it you can drag the markers for the shadows, mid-tones and highlights.
In the expert settings you can select the colorspace compression
and set the color cast removal(CCR) value

more movies
|
|
| | |
|
 | Rotation and flip tool. |
Used for rotating and flipping the entire workplace.
The tool for the rotation of individual frames on a flatbed is located in the densitometer expert settings. |
| | |
|
 | Créer et modifier de cadres de numérisation. |
Le menu Cadre vous permet d'accéder à tous les outils utilisés pour la création, l'enregistrement, le chargement, la copie et la suppression des cadres.
Il vous permet de créer automatiquement les images à l'aide de l'option automatique de cherche des cadres.
Dans des appareils qui peuvent gérer plusieurs cadres (comme les scanner à plat), vous pouvez copier facilement les paramètres du cadre sélectionné à tous les autres cadres.
SilverFast Ai Studio vous permettez de sauvegarder et de charger des réglages pour un cadre et même de les utiliser par défaut pour tous les cadres que vous créez.
Ce comprend par exemple la résolution et les paramètres pour tous les outils actifs. |
| | |
|
 | Gradation adjustment. |
The gradation allows you to individually adjust the brightness values.
The Midtone slider allows you to make your image appear brighter without "burning out" any colors. Which is why the slider has certain limits.
In addition you can adjust the contrast values.
|
|
|
| | |
|
| Comment puis-je obtenir rapidement une image naturelle? |
|
SilverFast offre plusieurs méthodes automatiques de réglages d'image. Grâce à eux, les lumières, les ombres et la gradation sont automatiquement ajustées selon le contenue individuel de votre image.
|
|
|
| | |
|
 | Pipette tool. |
The pipette tool allows you to manually select the highlights and shadows in your image and remove color casts.
To remove a color cast simply open the pipette tool and select the neutral point pipette.
Now click on the an area in your image which should be a neutral grey.
SilverFast will use this information to remove the color cast.
SilverFast Ai Studio allows to set up to 4 neutral points for an even more precise correction.
Using the 4 point pipette in Ai Studio:
|
more movies
|
Using the single point pipette:
|
|
|
| | |
|
 | Un-Sharpening Mask (USM) |
T
The USM tool allows you to sharpen your images.
To view your changes in the preview window please activate the 1:1 preview in the USM dialog.
|
|
|
| | |
|
 | Quelle profondeur bit devrais-je utiliser? |

48-> 24 Bit est l’option standard utilisée pour les images .jpg et pour la plupart des images standards.
|
| | |
|
 | How do I adjust the global color values using the Global CC? |
The Global Color Correction can be helpful for:
-remove color casts.
-adjust color perception.
-adjust global color temperature.
|
|
|
| | |
|
 | iSRD infrared scratch and dust removal. |
iSRD is a fully automatic scratch and dust removal tool. It detects defects through the hardware using the scanners infrared sensor.
This option is only available for transparency scans and scanners which offer an infrared channel.
It can not be used with silver halide based B&W film. The silver halide emulsion of these films block the infrared beam (more info here).
|
|
|
| | |
|
| Comment puis-je mesurer la résolution maximale pour mon scanner? |
Le bord du contraste définit la résolution réel qu'un dispositif individuel peut obtenir.
Cette valeur varie la résolution physique donné à cause de plusieurs effets physiques.
Cette connaissance permet de sélectionner la résolution la plus efficace pour vos numérisations.
En obtenant la meilleure résolution et netteté limite les temps de la numérisation.
LaserSoft Imaging offre la mire de résolution USAF pour mesurer cette résolution.
Ce vous permet de mesurer la meilleure résolution pour votre scanner et de définir les valeurs optimales USM pour une certaine résolution.
Plus d'informations sur l'USAF peut être trouvé ici sur notre site.
Ces mires peuvent être achetés également dans notre boutique en ligne.
Pour plus d’informations, s'il vous plaît visitez notre page de videos.
Ici vous trouverez nos videos sur le réglage de la résolution pour votre produit SilverFast. |
| | |
|
 | How to adjust individual colours. |
The Selective Color Correction (Selective CC) allows you to select individual color values and adjust them.
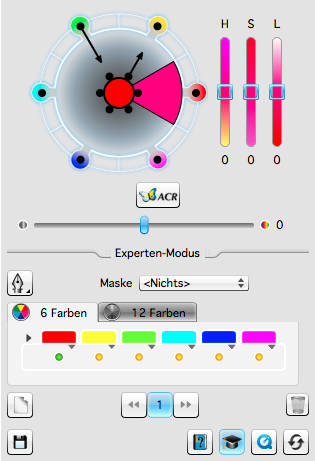
For greyscale mode this tool is replaced by the Selective Color to Grey (SC2G) tool.
|
Simply click on the center circle and the pick a color from your image.
Now you can edit the colour value by dragging the small black circles or by changing the HSL(Hue, Saturation, Luminescence) values.
The Expert mode allows you to limit the changes by adding a mask.
You change between 6 colour and 12 colour editing mode.
And use presets for the individual color channels.
In SilverFast Ai Studio you can use up to four individual layers for masks with individual settings.
|
| |
| | |
|
 | Auto Adaptive Contrast Optimization. (AACO) |
AACO enhances specific contrast levels.
By individually adjusting it's settings to a specific image you can enhance the visibility of certain areas.
|
|
|
| | |
|
 | SRD scratch and dust removal. |
SRD is the software sided scratch and dust removal. Other than the hardware based iSRD this tool must be adjusted individually to each image. To view our changes you have to activate the 1:1 preview in the SRD tool dialog.
The SRD tool always must be individually tailored to each image. The expert dialog offers the possibility to use masks to limit the correction to certain areas. SilverFast Ai Studio offers up to four layers with different settings.
SRD has been replaced by the more advanced SRDx in version 8.8
|
|
|
| | |
|
 | Scan / Process |
This is the final step.
After pre-scanning/loading and setting up your image it starts the final scan (SilverFast SE, SE Plus and Ai Studio) or processing ( SilverFast HDR and HDR Studio) of the image.
It also allows you to switch between batch and single mode.
|
|
|
| | |
|
 | Grain and Noise Elimination. (GANE) |
GANE allows you to remove the film grain and sensor noise from a scan.
Many current scanners are able to scan at resolutions which are higher than the film resolution.
In such cases the film structure (grain) becomes visible.
The noise is a natural effect occurring in the scanner sensor.
SilverFast's Multi-Exposure (available in SilverFast SE Plus and Ai Studio)can prevent this from occurring.
|
|
|
| | |
|
 | Descreening. |
Removes print screen from reflective material.
This tool is only available for flatbed devices in reflective mode.
In case this tool does not work as expected, please check the entered screen value.
|
|
|
| | |
|
 | Multi-Exposure. (ME) |
Multi-Exposure uses two separate scans to achieve a much higher Dynamic-Range than a standard scan could.
This greatly reduces sensor noise. Especially in dark image areas. Additionally the higher Dynamic-Range offers a great advantage when processing images in professional imaging software like SilverFast HDR Studio or Photoshop.
Multi-Exposure is available in SilverFast SE Plus and Ai Studio.
|
|
|
| | |
|
 | Outil Focus |
L'outil réglage focal est disponible uniquement si le scanner offre une fonction de focus.
Les options sont disponibles selon les fonctions offert par le scanner.
Les scanners avec une unité focus fixe ne offrent pas cet outil. br>
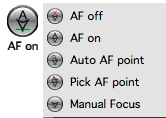
Contrôle manuel focus
S'il vous plaît, regardez notre video et donne PDF pour apprendre comment utiliser le contrôle manuel de focus.
|
|
|
| | |
|
 | IT8 calibration. |
The IT8 calibration creates an individual ICC profile for your scanner. It makes sure your scanner produces correct colours and utilises the entire range of colours available from it's sensor.
This is a basic step in professional image processing.
The SilverFast IT8 calibration is fully automatic. In most cases no user interaction is required. Only the target's reference file might have to be provided. The profile is automatically created and put in use.
The IT8 calibration is available in SilverFast Ai Studio.
|
|
|
| | |
|
 | Can I adjust my calibrated printer profile? |
Yes you can. The Printer Calibration Profile Editor allows you to adjust your calibrated profiles to your workflow.
Since color is a subjective perception, SilverFast offers the option of editing the generated profile according to the user’s desires.
|
|
|
| | |
|
 | Scans from Black&White negatives show artifacts. |
| | |
|
 | How do I copy selected settings using the JobManager? |
You can copy selected settings using the copy&paste function in the JobManager.
It allows you to copy individual settings and options from one image to one or more others.
It allows you to either copy manual settings or the auto adjustment you would like to use.
The automatic image adjustment (e.g. auto CCR) will then be individually executed for each image.
|
|
|
| | |
|
 | JobManager. |
The JobManager allows you to set up jobs containing several images.
You can define the order in which the images are scanned (for auto numbering).
You can copy selected settings and combine them individual settings for individual images.
It allows you to either copy manual settings or the auto adjustment you would like to use.
The automatic image adjustment (e.g. auto CCR) will then be individually executed for each image.
The JobManager is available in SilverFast Ai Studio and HDR (Studio).
|
|
|
| | |
|
 | PrinTao. |
SilverFast Ai/HDR Studio offers the integrated PrinTao printing interface for directly printing your scans.
It is includes in SilverFast Ai Studio and HDR Studio.
Please do not confuse this option with our new and advanced PrinTao 8 Software.
|
|
|
| | |
|
| Comment puis-je configurer un scanner par lots avec mon scanner à plat? |
Pour numériser par lots vos photos, première vous devez créer des cadres individuelles de numérisation pour chaque image. La meilleure façon de le faire est d'utiliser l’option "recherche de cadres" dans le menu de cadres.
Chaque cadre possède ses propres réglages. Vous pouvez ajuster un cadre et ensuite utiliser l’option “copier réglages à toutes les marges”,vous pouvez également la trouvée sur le menu des cadres.
Pour commencer la numérisation par lots tout simplement cliquez et maintenez le bouton de numérisation pour sélectionner le mode de numérisation par lots dans le menu qui apparaîtra.
|
|
|
| | |
|
 | Overview |
This tool is only available for Scanners with automated filmstrip or slide magazine processing.
It allows you to get an overview of the filmstrip and select (blue) which images to scan.
An offset correction tool is also available to correct the position of individual images.
This is only available if the software supports offset correction.
Users of slide magazine scanners can set up the magazine position and amount of slides.
Scanners with dual scan mode (single slide and film strip) only show this option if a film strip is inserted.
|
|
|
| | |
|
 | Which workflow should I use? |
The WorkflowPilot offers various goal-orientated, pre-set guided workflows.
It is meant as a trainig/tutorial tool to learn necessary steps in creating an image.
SilverFast Ai Studio additionally allows you to create your own workflows in the SilverFast preferences.
Follow this link for a list of available workflows.
|
| | |
|
| Comment redémarrez SilverFast avec les réglages d'usine? |
Vous pouvez redémarrer SilverFast vers le service de dialogue dans l'écran d'accueil de SilverFast.
|
|
|
| | |
|
| Comment puis-je initier SilverFast avec des réglages de cadre personnalisés? |
Cela permet aussi la création de nouvelles cadres à l'aide de réglages personnalisés. |
| | |
|
 | Photoshop does not show the image's meta data correctly. |
The meta data in SilverFast is written using the IPTC NAA-/IIM-Standard.
According to this standard the tags are written correctly.
Photoshop however uses its own format for metadata called IPTC XMP.
Unfortunately this causes Photoshop to show some tags incorrectly. |
| | |
|
| Un offset se produit dans l'outil réglage focal manuel. |
| | |
|
 | My question is not covered by the entries above. |
| | |
 English
 Deutsch
 Français
 Italiano
 日本語
日本語 Español
 Português
 Russian
 Chinese (Simp.)
 Tchèque
 Polonais (seulement boutique)
 SilverFast 8
 Questions avant achat
 Questions après l’achat
 Apple OSX
 Des questions spécifiques de Windows
 Problèmes spécifiques du scanner
 Questions sur l’enregistrement
 Problèmes avec la sérialisation
 How to Update/Upgrade
 Questions sur l'utilisation
 NegaFix
 Questions générales