 English
 Deutsch
 Français
 Italiano
 日本語
日本語 Español
 Português
 Russian
 Chinese (Simp.)
 Tcheco
 Polish (Store only)
PrinTao can be used as a direct scan-to-print feature, but it is flexible and powerful enough to also support some basic layout functionality. Before you actually scan the images on the scanner's glass plate you can set up a document layout with PrinTao and have it printed almost while the images scan.
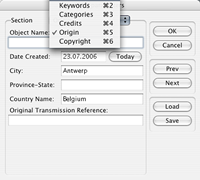
SilverFast Ai Studio must be the only scanner software that enables you to fill in IPTC data with every scanned image. This allows you to track and trace images through meta data just as with digital camera photographs. EXIF and IPTC text can also be used in PrinTao, together with other text you define. All these capabilities are available on multiple pages.
Printing a presentation document, like a simple flyer is also possible with PrinTao. It involves adding text yourself in independent text boxes on the page(s). The basic workflow always remains the same.
The first thing to do in order to scan directly to a layout with SilverFast PrinTao, is open Photoshop or your SilverFast host application. A prescan of all the images on the glass plate of your scanner is what starts the PrinTao workflow.
As soon as the prescan has finished, each image can be edited as you would normally do. You can set resolution for each image, correct its colours, etc. A good advice is not to set different resolutions for images that will be printed through PrinTao in the same document. Another word of advice: although you could set each image to scan to a very high resolution; if your intention is to print a contact sheet or flyer, use the default settings. They work just fine.
PrinTao interface
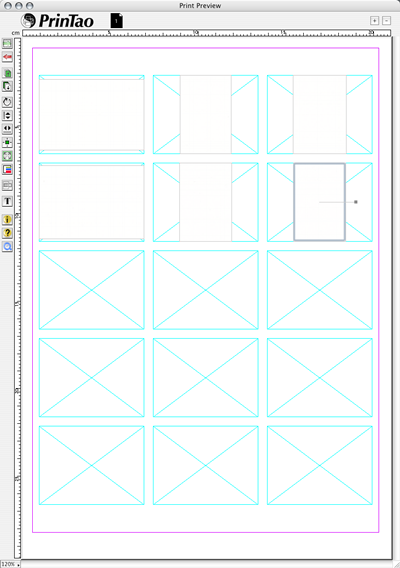
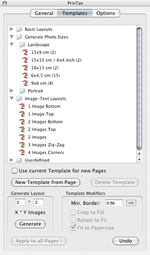
The PrinTao interface looks somewhat different from what we you are used to with other layout programs, but the interface is easy and makes sense. The first thing you will do is select one of the templates - you can also create your own - to automatically set up the image positions on the page. When starting the PrinTao module, you will notice the images are in the exact same positions as they have been pre-scanned.
Upon selecting a template, those images that fit into the template's image areas will automatically be positioned into their image boxes. If there are more images on the page, they will stay foot on the page - the glass plate or virtual light table, so to speak. You can add another page and drag the images to the new page. When you switch to that new page, you can again assign a template to that page and you will see the whole process happening all over again.
Remember we're still working with the prescanned images. As soon as you're happy with the scale, rotation, text boxes, frames and colours on each PrinTao page, it's now time to choose the colour setup.
SilverFast is very colour management aware, and so is PrinTao. You can select ICC Profiles and Rendering Intent, just as with QuarkXPress or InDesign before you actually start printing your pages.
Once you've done that, you - the operator - are done. Hit the Print button and SilverFast will take over. It will scan each image at its target resolution, and will collect all the images for printing through the PrinTao engine.
The end-result is a nicely laid out page with text, and your images in a fraction of the time it would cost you to first scan the images, edit them, create an InDesign or QuarkXPress document for them, etc.
(Source: IT-Enquirer)