Scan Resolution:
The Resolution (Res.) is one of the key factors on how much information your image will contain. It is not always sensible to use the highest resolution value. The higher the resolution the more detail can be visible. But edges can be less defined and seem less sharp. The scanner will also take longer to scan your image. SilverFast will have to process more information which can take longer than necessary for your goals. The files will also increase in size. The higher the resolution the more sensor noise will appear in the images. (
Multi-Exposure can greatly reduce this.)
How to select the best resolution:
First be aware what you need. Where do you want to view the images or how large do you want to print.
Viewing on a computer screen, TV or sending to the Internet:
Simply set SilverFast to several resolutions and make some scans. Then load the images into an image viewer on your computer (or the intended device). Set the viewer to 100%. This will give you an idea about the amount of detail the scan provides and how large the image really is. And it shows if you already are above the film resolution (seeing the film grain). For Internet or TV load the images onto the target device and check the time it takes to load the image.
Printing your Images:
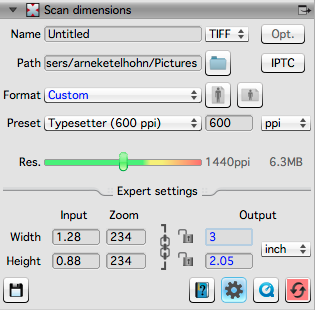
SilverFast provides an easy way to scan for printing. Open the scan dimensions dialog. Simply select your intended print resolution in the preset selection. Then set the output size in the expert settings (gear-wheel symbol). SilverFast will automatically set the resolution to the correct size.
For more informations please visit our movie page.
Here you will find our movies on setting the resolution for your SilverFast product.
Sharpness:
Please note that most devices use fixed focus units. Exceptions are for example the EPSON Expression series and Nikon Scanners. These devices allow you to select focus points and/or in some cases to set the focus manually. The focus works best at edges with a good contrast.
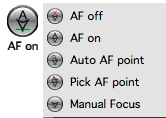 (available options depend on hardware capability.)
In most cases the standard auto focus works without issues.
Some exceptions can be:
- images with large homogenous areas.
- material which is curved or uneven.
In such cases set the focus to an area with good contrast. Use a location halve-way between the image center and edge.
For other devices the
USM tool can be used to enhance the sharpness of an image.
 Dynamic-Range:
The Dynamic-Range is the amount of color steps your final image can provide. For most scanners SilverFast SE Plus and Ai Studio offer the Multi-Exposure functionality. Multi-Exposure maximises the Dynamic-Range of a scan.
This is important for:
- dark images where Multi-Exposure will allow you to get much more data from dark areas.

- further processing in SilverFast HDR (studio), Photoshop or other professional software capable of handling 48 bit data. The higher Dynamic-Range will provide much more data for processing. This allows filters and tools to work more efficiently.
- reducing scanner noise.